So you want to import a table in your database with phpMyAdmin?
phpMyAdmin is a useful database tool that can be used for a variety of MySQL database operations. The following tutorial covers the import feature. Before you make any changes, be sure that you make a current backup of your database before making any changes. Importing a table means that you will be bringing data and/or a table structure into the database. Note that this is different from importing a database.
Table imports through phpMyAdmin are limited to 50 MB. Tables larger than 50 MB will require that you submit a ticket to technical support.
Supported File Formats
When importing a table into phpMyAdmin, selecting the right file format ensures proper data interpretation. Supported formats include:
- SQL (.sql) – This format is the best choice for preserving both table structure and data. It contains CREATE TABLE, INSERT, and other MySQL commands and is ideal for full database backups.
- CSV (.csv) – This format is used for spreadsheet-like data. It requires column mapping and is best for importing raw data (not structure).
- XML (.xml) – This format is Less common and is useful for structured data interchange. To successfully download a table, it must match phpMyAdmin’s expected format.
- ODS/JSON/YAML – This format provides limited support depending on server configuration. It is used for specialized cases.
Tip: If you’re unsure which format to use, SQL is generally the safest and most reliable option for preserving both structure and content of the table.
How to Import a MySQL Database Table
- Login to the cPanel.
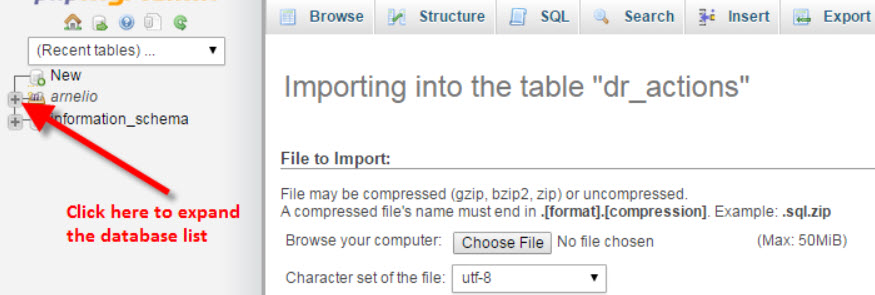
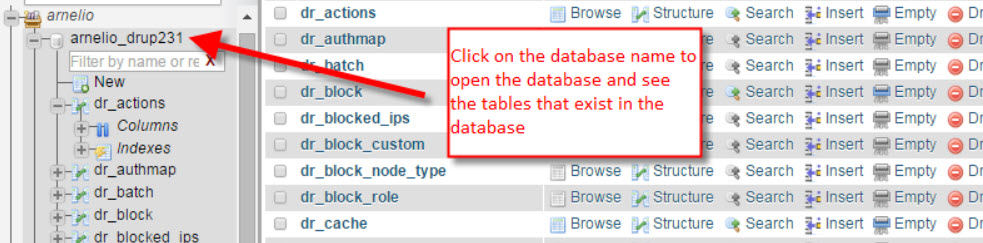
- Next, click on the name of the database that you wish to use for the import. Before you begin the file import, you will need to make sure that the same table does not already exist. Delete or drop the table with phpMyAdmin before you begin the import if you see that the table already exists. Make sure that you have backed up your database before you delete anything.

You will see the database tables listed in the screen to the right. In the top right of the phpMyAdmin interface, you should see a row of options starting with Browse. Click on Import in order to begin the import process.

There are a number of options that you can select with import, but this tutorial deals with the default settings. Click on Choose file in order to choose the file that you wish to import. Please note again, that the file size limit for imports through phpMyAdmin is 50 MB.

The format of the file used for import should be SQL. This can be changed by clicking on the drop-down arrow for Format. However, to keep things simple, we are going to be using the default format of .SQL. Click on Go in order to start the import.

This completes our tutorial on importing tables into a database. Depending on the size of the table, it may take some time for the import to complete. When the import completes you will be able to look at the tables of the database and see the table that you have imported.

Import Options and Settings
When importing a table in phpMyAdmin, you’ll find several options that help customize the process beyond just using the default SQL format.
SQL (.sql) is the most commonly used format because it includes both the table structure and the data. However, phpMyAdmin also supports formats like CSV (.csv) for data-only imports, as well as XML and compressed files like .zip or .tar.gz.
Format: Choosing the correct format is important for a successful import and should match the type of file you’re working with.
Character set: Another key setting is the character set. This determines how data is encoded, which affects how special characters and non-English text are handled. UTF-8 is recommended because it supports a wide range of characters and works well with most databases.
Foreign key checks and partial imports: phpMyAdmin also offers settings such as foreign key checks and partial imports. Foreign key checks help maintain relationships between tables. Disabling them temporarily can speed up large imports or avoid issues when related data isn’t imported in the right order. Just be sure to re-enable them afterward to preserve data integrity.
Partial import settings control how phpMyAdmin responds to errors. You can choose to continue on error—logging failed rows but completing the import for valid data—or rollback on error, which cancels the entire import if any problem occurs.
“Continue on error” works well for large, non-critical data loads. In contrast, “rollback on error” is better for critical imports where data consistency is essential.
CSV Import Guide
Importing CSV files requires some specific configurations to ensure data integrity:
- Delimiter Configuration: Specify the character that separates your fields in the CSV file, usually a comma (,) but sometimes semicolons (;) or tabs.
- Handling Headers: Indicate whether your CSV file includes a header row with column names. If so, make sure to select the option so phpMyAdmin treats the first row correctly.
- Excel Conversion: If your data is originally in Excel, export it as a CSV file before importing. Ensure the CSV file formatting matches the structure of the target table, including the correct number of columns and data types.
Troubleshooting Common Import Issues
Database imports can be tricky, but knowing how to tackle common errors makes the process smoother. Here are some common import issues and how to troubleshoot them:
File Size Limitations and Workarounds
phpMyAdmin often has an upload limit (commonly 50MB). For larger files, consider splitting the SQL file into smaller parts or use SSH with command-line tools like mysql for importing.
Column Count Mismatch Errors
This occurs if the number of columns in your CSV file doesn’t match the table’s columns. Double-check your CSV file and the target table structure to ensure alignment before importing.
Character Set/Collation Problems
If you notice strange characters or encoding issues after import, revisit the character set selection and ensure it matches the encoding of your source file and the database’s collation settings.
Timeout or “MySQL Server Has Gone Away” Errors
These errors happen when the import process takes too long or the server disconnects. Increasing server settings like max_allowed_packet or importing via command line instead of phpMyAdmin can resolve these issues.
SQL Syntax Errors
If your import fails with syntax errors, review the SQL file for mistakes such as missing semicolons, incorrect commands, or unsupported features. Cleaning up the SQL file or exporting again from the source often fixes these issues.
- Delimiter Configuration: Specify the character that separates your fields in the CSV file, usually a comma (,) but sometimes semicolons (;) or tabs.


I want to import a table exported from a different db into an existing table (without overwriting existing values). How do I do that?
(Right now, the import “into the existing table” actually just creates a new one.) I want to concatenate them.
Thanks
Hey Quantillion, I know that database tasks can go from simple to complicated pretty quickly, so I hope I can offer some tips.
The easiest way to do this is with an SQL query. We cannot directly support coding/programming, but I can point you in the right direction. First, before doing anything make sure you have a secure backup of both databases. You can’t be too careful when making changes like this!
From there, a slower but easy way to do this would be to export the database to a .CSV format, then use SQL code to import only the unique, relevant values from the appropriate table into the new database. I hope that points you in the right direction, but feel free to reach out to our Managed Hosting team if you need someone to assist you with the code directly.